|
| Fig. 1 3D model of a real house near Boston (2,150 sq ft). |
On August 3, 2015, President Obama announced the
Clean Power Plan – a landmark step in reducing carbon pollution from power plants that takes real action on climate change. Producing clean energy from rooftop solar panels can greatly mitigate the problems in current power generation. In the US, there are more than 130 million homes. These
homes, along with commercial buildings, consume more than 40% of the
total energy of the country. With improving generation and storage technologies, a large portion of that usage could be generated by home buildings themselves.
A practical question is: How do we estimate the energy that a house can potentially generate if we put solar panels on top of it? This estimate is key to convincing homeowners to install solar panels or the bank to finance it. You wouldn't buy something without knowing its exact benefits, would you? This is why solar analysis and evaluation are so important to the solar energy industry.
The problem is: Every building is different! The location, the orientation, the landscape, the shape, the roof pitch, and so on, vary from one building to another. And there are over 100 MILLION of them around the country! To make the matter even more complicated, we are talking about annual gains, which require the solar analyst to consider solar radiation and landscape changes in four seasons. With all these complexities, no one can really design the layout of solar panels and calculate their outputs without using a 3D simulation tool.
There may be solar design and prediction software from companies like Autodesk. But for three reasons, we believe that our
Energy3D CAD software will be a relevant tool in this marketplace. First, our goal is to enable everyone to use Energy3D without having to go through the level of training that most engineers must go through with other CAD tools in order to master them. Second, Energy3D is completely free of charge to everyone. Third, the accuracy of Energy3D's solar analysis is comparable with that of others (and is improving as we speak!).
With these advantages, it is now possible for homeowners to evaluate the solar potential of their houses INDEPENDENTLY, using an incredibly powerful scientific simulation tool that has been designed for the layperson.
In this post, I will walk you through the solar design process in Energy3D step by step.
1) Sketch up a 3D model of your house
Energy3D has an easy-to-use interface for quickly constructing your house in a 3D environment. With this interface, you can create an approximate 3D model of your house without having to worry about details such as interiors that are not important to solar analysis. Improvements of this user interface are on the way. For example, we just added a handy feature that allows users to copy and paste in 3D space. This new feature can be used to quickly create an array of solar panels by simply copying a panel and hitting Ctrl/Command+V a few times. As trees are important to the performance of your solar panels, you should also model the surrounding trees by adding various tree objects in Energy3D. Figure 1 shows a 3D model of a real house in Massachusetts, surrounded by trees. Notice that this house has a T shape and its longest side faces southeast, which means that other sides of its roof may worth checking.
 |
| Fig. 2 Daily solar radiation in four seasons |
2) Examine the solar radiation on the roof in four seasons
Once you have a 3D model of your house and the surrounding trees, you should take a look at the solar radiation on the roof throughout the year. To do this, you have to change the date and run a solar simulation for each date. For example, Figure 2 shows the solar radiation heat maps of the Massachusetts house on 1/1, 4/1, 7/1, and 10/1, respectively. Note that the trees do not have leaves from the beginning of December to the end of April (approximately), meaning that their impacts to the performance of the solar panels are minimal in the winter.
The conventional wisdom is that the south-facing side of the roof is a good place to put solar panels. But very few houses face exact south. This is why we need a simulation tool to analyze real situations. By looking at the color maps in Figure 2, we can quickly figure out that the southeast-facing side of the roof of this house is the optimal side for solar panels and we also know that the lower part of this side is shadowed significantly by the surrounding trees.
 |
| Fig. 3 Solarizing the house |
3) Add, copy, and paste solar panels to create arrays
Having decided which side to lay the solar panels, the next step is to add them to it. You can drop them one by one. Or drop the first one near an edge and then copy and paste it to easily create an array. Repeat this for three rows as illustrated in Figure 3. Note that I chose the solar panels that have a light-electricity conversion efficiency of 15%, which is about average in the current market. New panels may come with higher efficiency.
The three rows have a total number of 45 solar panels (3 x 5 feet each). From Figure 2, it also seems the T-wing roof leaning towards west may be a sub-optimal place to go solar. Let's also put a 2x5 array of panels on that side. If the simulation shows that they do not worth the money, we can just delete them from the model. This is the power of the simulation -- you do not have to pay a penny for anything you do with a virtual house (and you do not have to wait for a year to evaluate the effect of anything you do on its yearly energy usage).
4) Run annual energy analysis for the building
 |
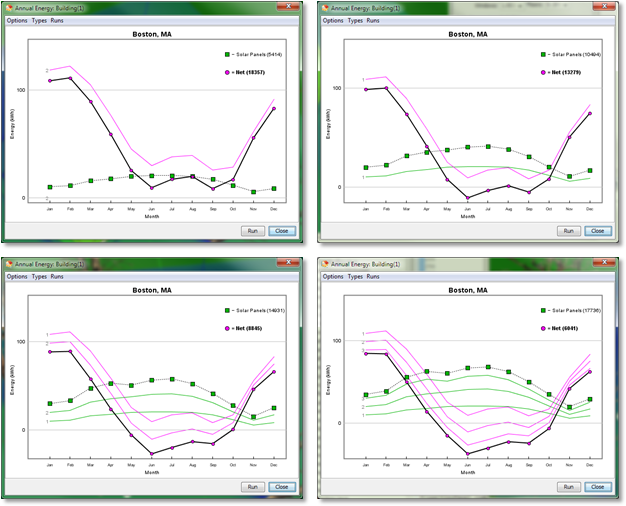
| Fig. 4 Energy graphs with added solar panels |
Now that we have put up the solar panels, we want to know how much energy they can produce. In Energy3D, this is as simple as selecting "Run Annual Energy Analysis for Building..." under the Analysis Menu. A graph will display the progress while Energy3D automatically performs a 12-month simulation and updates the results (Figure 4).
I recommend that you run this analysis every time you add a row of solar panels to keep track of the gains from each additional row. For example, Figure 4 shows the changes of solar outputs each time we add a row (the last one is the 10 panels added to the west-facing side of the T-wing roof). The following lists the annual results:
- Row 1, 15 panels, output: 5,414 kWh --- 361 kWh/panel
- Row 2, 15 panels, output: 5,018 kWh (total: 10,494 kWh) --- 335 kWh/panel
- Row 3, 15 panels, output: 4,437 kWh (total: 14,931 kWh) --- 296 kWh/panel
- T-wing 2x5 array, 10 panels, output: 2,805 kWh (total: 17,736 kWh) --- 281 kWh/panel
These results suggest that 30 panels in Rows 1 and 2 are probably a good solution for this house -- they generate a total of 10,494 kWh in a year. But if we have better (i.e., high efficiency) and cheaper solar panels in the future, adding panels to Row 3 and the T-wing may not be such a bad idea.
 |
| Fig. 5 Comparing solar panels at different positions |
5) Compare the solar gains of panels at different positions
In addition to analyze the energy performance of the entire house, Energy3D also allows you to select individual elements and compare their performances. Figure 5 shows the comparison of four solar panels at different positions. The graph shows that the middle positions in Row 3 are not good spots for solar panels. Based on this information, we can go back to remove those solar panels and redo the analysis to see if we will have a better average output of Row 3.
After removing the five solar panels in the middle of Row 3, the total output drops to 16,335 kWh, meaning that the five panels on average output 280 kWh each.
6) Decide which positions are acceptable for installing solar panels
The analysis results thus far should provide you enough information with regard to whether it worth your money to solarize this house and, if yes, how to solarize it. The real decision depends on the cost of electricity in your area, your budget, and your expectation of the return of investment. With the price of solar panel continuing to drop, the quality continues to improve, and the pressure to reduce fossil energy usage continues to increase, building solarization is becoming more and more viable.
Solar analysis using computational tools is typically considered as the job of a professional engineer as it involves complicated computer-based design and analysis. The high cost of a professional engineer makes analyzing and evaluating millions of buildings economically unfavorable. But Energy3D reduces this task to something that even children can do. This could lead to a paradigm shift in the solar industry that will fundamentally change the way residential and commercial solar evaluation is conducted. We are very excited about this prospect and are eager to with the energy industry to ignite this revolution.